
"Self blossom" project
Topic focus:
The topic focus is meant to help you focalize on the information you would be interested into in a quicker and easier way on this specific page.
Just simply click on any of the above links to be focused on the presented topic.
Rationale:
"After all the hardship, pain, self-hatred, the war against yourself, the long path full of social poison that does not let you breathe and does not allow a moment of freedom and peace, trusting the people who shattered your trust...at the end, even when you bloomed late, you came out the most beautiful of all".
-shirel souffir elbaz-
The main piece of the project is a tree made out from bamboo canes that are attached by a "screw and click" technique, and then covered with colored glass flowers.
The flowers technique is inspired by the "layering" chinese method to create glass aesthetic objects.
Usually cherry trees are trees that all bloom at once and at the same time.
The tree in my work ressembles a cherry tree which did not bloom at the same time as the other trees and was late in bloom.
Despite all its failures to flower cherry blossoms with the rest of the trees, finally when its flowers bloomed, they came out the most beautiful of all.
The ink drawing located behind the tree depicts the flowers of the other trees wilting even before the small tree managed to flower its flowers with them.
I used the image to make it more likeable to people- people who find it difficult to enter the society and "blossom" with everyone else, who are hurt by some society's attitude towards them because they are perceived as "inferior".
At the end, however, they find their place and flourish in their own ways as they become the ones that other people aspire to be like because they came out the most successful and the most prominent of all.
That's because they were special in their own unique way.

Self Blossom final artwork-galery


Video of the making of self blossom artwork
Work process:
The tree:
Base construction:
The base is a wooden plate that is fastened with locking wheels to make it easier to control the movement of the tree or vice versa when stopping at the exhibition.
On display, this plate is covered with dried bamboo leaves that serve as a connection to the tree itself, which is a cherry tree made of bamboo cane pieces.
Building the trunk:
The trunk consists of several key parts to allow it to be stable when assembling the branches and flowers. Firstly, there is the bottom of the trunk which served as a connection to the wood plate and stabled the main part of the trunk which is placed in the center of the bottom part. (See Draft # 1).

1
The central part of the trunk is one wide bamboo cane that is cut in half. Eight perforations were drilled in each wide bamboo - four inner and four outer. These perforations are drilled respectively so that each inner perforation fits into an outer perforation. (see draft # 2).
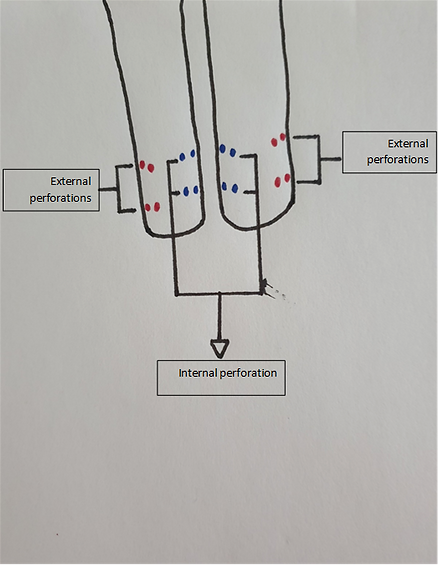
2
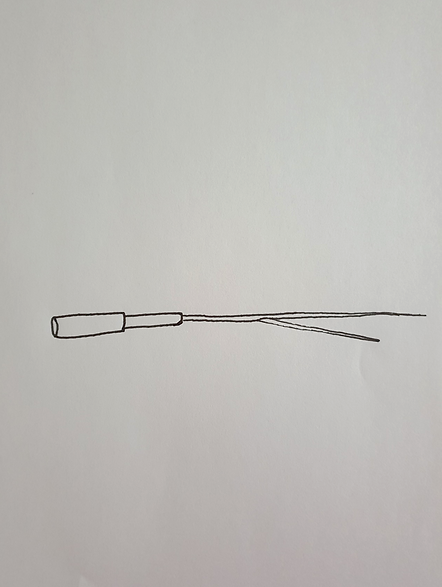
In each of the four adapted perforations a metal wire is threaded so that there are four metal wires threaded in total at the base of the central part of the trunk.Wire I is tied to Wire III and Wire II is tied to Wire IV on both sides (see draft # 3).

3
After tying the metal wires, the epoxy glue was applied in the inner bore area and glued together the two bases of the center of the trunk and then, the two bamboo canes were wrapped in two types of tape. The first one was grey and strong and was used to fix the entire central section and the second one which is brown was used to mask the first grey tape. (see draft # 4).

4
Then bamboo parts were first placed around the central trunk part to create the bottom part which would fit exactly to the central part, and then two perforations were drilled inside each "tube" of bamboo, one on each side of the tube.
Through these perforations a metal wire was threaded which connected them all and tightened them to a shape that corresponded exactly to the central part of the trunk. This thread is tied and inserted from beneath the bottom part of the trunk and fixed into it.
(See draft # 5).

5
Connecting the trunk to the wooden plate:
Firstly the bottom part was connected. In each bamboo tube, two perforations were drilled which, according to them, were fitted perforations in the plate. Then all the connected tubes on the plate were arranged according to the perforations drilled on it and then all the bamboo tubes were bolted to the wooden plate where the perforations were drilled respectively.
*The central part was connected to the wooden plate using the same technique(See draft # 6).

6
Construction of the branches:
Firstly on the central part of the trunk were marked the positions of the branches and the angle at which each branch will be inclined so that with pressure they will be fixed in place within the trunk. In addition, the distances between each branch were calculated so that they could fit within the central part of the trunk which is hollow and not get stuck in each other. (See draft #7).

7
Each branch is made up of a number of bamboo parts that are interconnected with each other in a pressure technique and carved to give a more realistic look of a cherry tree branch.
(See Draft # 8).
8
Then the diameter of each back of a branch was measured and perforations were drilled to the same extent according to the different branches where the markings were. The branches were pressurized in the perforations drilled accordingly to the central part of the trunk.
To create more thickening of the branches and the appearance of a fuller tree small pieces of thin bamboo were glued with hot glue. They were sawn and sanded at an angle to suit the location of their gluing
(see draft # 9).
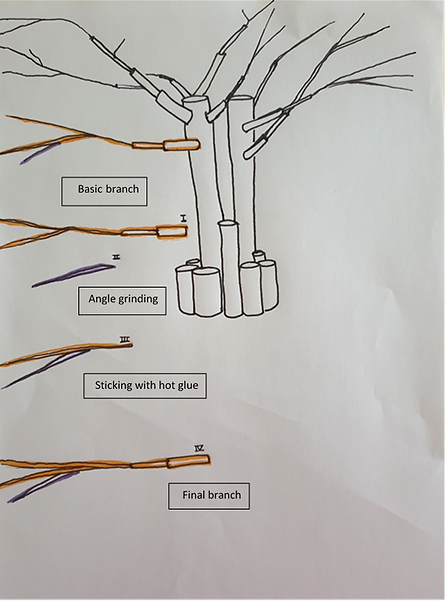
9
Flower assembly:
Firstly, in order to make the flowers, a glass squares about 60 cm by 60 cm should be disinfected with alcohol . The glass squares were cut using a glass cutter and a glass pliers into long strips in two different sizes.
Each size will define the size of the flower petals.
On each strip were drawn in black lord pen petals shapes which were then cut into petals. The two sizes of the strips would give two different sizes of petals- large petals which would be the outer ones of the flower and the smaller ones which would be the inner ones.
After being cut the petals were wiped with a napkin dipped in alcohol to clean the remnants of the Black Lord pen. (See draft # 10).

10
In addition to the petals, small glass squares were cut as well. They will serve as a base for assembling the flowers.
The next step was to assemble the flowers.
On pieces of Fiber (a very high heat resistant material that will enter the glass oven with the flowers on it), the flowers were built.
To assemble one flower, first, a small square of glass was placed over which white plastic glue was applied. Using the white plastic glue, the large petals were glued to the glass square and then the small petals were pasted between each large petal. Each flower has six large petals and six small ones. (See draft # 11).

11
Coloring the flowers-
After assembling the flowers, they were painted with a mixture of pink glass powder and water using a soft water brush.
The painted flowers were placed in a glass oven for first burning.
The first fire fixed the glass together to be one piece and not fall apart.The purpose of the second fire is to give the glass flowers their final shape.
In order to do this, templates/ moldes were required. To build the molds a compound of gypsum powder and quartz powder was prepared which were mixed with water.
The compound was put into plastic cups and after they had dried completely to get them out of the cups, the cups had to be broken. After breaking the cups all that was required was to turn the mold over on a fiberboard and place over them the flowers which had undergone a first burn. These were put into a second fire in the glass oven. (See draft # 12).

12
Once the flowers have all undergone a second fire, under each one of the flowers a small screw was glued to the bottom of the flower with epoxy glue. The head of the screw was fixed to the flower.
The screwing technique will allow the flowers to be screwed and disassembled from their screwing place to make it easier to move the tree without the flowers breaking.
For this reason the flowers are not screwed onto the tree until the tree is not in place in its display position. (See draft # 13).

13
The roots:
The roots are simply roots that originated in Asia and were screwed to the bottom of the trunk.
the painting:
The painting is basically a two continues parts minimalist black ink painting on rice paper that is 4 meters high and one meter wide for painting. The paintings are backed up with clips that catch them on two long bamboo cans.
On the clips, small sponge strips are glued on the inside to prevent the rice paper from tearing.
The bamboo cans on which the paintings are hung to are hunged by strong spouted thread that is tied to the wall. (See draft # 14).

14
Credits and gratitudes
Credits for the music that was used in the making video:
All the rights go to their respectful owners and creators.
Gratitudes:
A big thank you to the people that helped me a lot during this whole process and invested so much of their time and much more, in order to make this artwork look the way it is today.
Thank you to the people who were always here for me and kept encouraging me till the final result.
I really appreciate each and everyone of you and I am grateful that you were a part of this long process with me.
lot's of love!~